We built a studio
14 October 2019
New house, new home - new studio
I owe you a bit of an explanation.
But before I do I should thank you for sticking round so long with radio silence here on the blog, though if you follow me on instagram then you will know I haven’t completely fallen off the face of the world.
So - why I’ve been away so long?
Let me introduce you to Number 55, also to be known as The Sometimes Gallery (but that is a whole story in itself, so perhaps we should leave that for another day).
If you have popped by here from time to time you will probably have noticed that my work space seems to be changing on a frequent basis. I get established somewhere, set up my studio (never ideal) only to move on again in a couple of years.
I have been renting and have lived in 3 different houses since I started my creative journey properly about 10 years ago.
The first was a lovely stone cottage with a work space off the kitchen. Cold in winter (the whole house was cold in winter!) but convenient.
The second was a Victorian pile in Winslow, just outside Milton Keynes. Also cold in winter but with a large workroom under my bedroom (except that the lighting was shocking) and somehow the space never seemed to work properly.
The third was by far the most comfortable house, a modern house but my workspace was a conservatory off the bedroom. Too hot in summer and freezing in winter. Great light though.
All of these places were temporary and, being rented under assured shorthold tenancies I was very limited in terms of hanging shelves and making the spaces work properly. Also, there was always the nagging concern that I was not master of my own destiny and that I would have to move on. All very uncertain and unsettling.
But then the opportunity arose to buy somewhere when I inherited a bit of money.
Looking round for somewhere to buy was a saga in itself, and at one point I despaired of ever finding anywhere that quite fitted the bill. I had a very specific shopping list:-
- Access to good dog walks (my girl is very important to me and needs her exercise)
- Some where for a good studio space - good light, useable all year round,
- Somewhere suitable for hosting Open Studios on a more permanent basis - we have been moving around Milton Keynes for the last 5 years
Not an unreasonable list but challenging to fulfill. Actually, I was getting pretty fed up with looking at houses.
But then I happened upon no 55. Small, but perfectly formed and tucked under the Grand Union Canal (dog walks? Tick!)
No space for an inside work space/studio (unless I forfeited a bedroom and I did want to be able to have people to stay, so not really an option) but no 55 has a lovely long garden, not so long that it is daunting but long enough for a garden studio. (Studio space? Tick!)
Garden and the back of the house are accessed via the side passage. (Open Studios? Tick!)
So, this looked like it could be the ‘one’.
Then there was months while all the legal stuff happened (that dragged on) and I eventually got the keys in November 2018.
And then the hard work began.
- Building the studio
- Decorating
- Refurbishing the bathroom
- Refurbishing the kitchen
- Painting, painting, painting
But here I am, nearly a year in and settled.
So let me take you through the journey that is my studio. Grab a cuppa - this will be a long one.
So let me take you through the journey that is my studio. Grab a cuppa - this will be a long one.
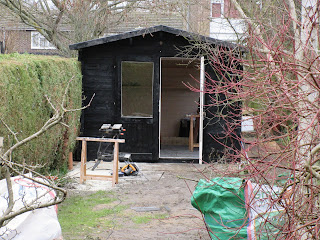
It started with a base at the end of the garden. I spent as much on the base as on the studio building, but you have to if this is going to last.
Then a pile of timber arrived from Dunster House ( complete with 2 fabulous builders)
And let the painting commence. Great tip this - paint as you build. Much easier, especially as it’s butted right up against the hedge.
Then the building started - luckily these two had done it before.
Progress was swift once the base was laid out.
Boards laid over suspended insulation.
The roof has felt shingles.
But this studio has water and electricity.
And double doors.
Really beginning to feel snug and cosy.
To keep the neighbours guessing.
The interior fit out.
Complete!
The garden was trashed during the build but quickly recovered. On the right only a few months later.
Well done for getting this far.
If you are thinking of a similar garden building then I’ll happily share what I learnt, but in summary:
- The base is critical - expect to pay as much for the base as the building. Make it bigger than the building for access etc.
- Electricity and water a must. Don’t scrimp here or the building will be useless. I’ve only got cold water but not a problem. I can heat a kettle if I want warm. The studio has its own mini fuse box - like you would fit in a garage.
- There is an insulated timber option on this building, but I went for just the thicker timber version. It warms up quickly with a blast from the electric fire. I have got floor and roof insulation. Not a lot but it makes a real difference.
- The cabin doesn’t come with guttering. That’s a problem still to be resolved.
I’ll save the interior for another post. It won’t be as meaty I promise.
IKEA hack
6 January 2019
I've made a quilt! A proper, traditional quilt! No paper to be seen!
And it took me months and months!
It all started with 3 of these.
I unpicked the Zips and two sides, just randomly, no great thinking going on here. Then I sewed the 3 covers together, in effect making a quilt top of 6 cushion panels.
My plan was to keep the quilting to 'in the ditch' using the 'patchwork' design to guide where I would actually quilt, so using my quilt frame was not appropriate. Instead, to sandwich the layers together I spread the quilt sandwich out on a double bed, used said bed as an ironing board, and then hand basted the whole lot together. It was back breaking stuff! And no photos to share because I just wanted to get the process done.
By this point the whole thing was getting heavy and unwieldy. I lugged it into the studio and set up the sewing machine. White thread on the bottom and a colour on the top to match the fabric colour - I'm just quilting in the ditch remember.
I huffed and I puffed and I wrestled! And I remembered why I stopped doing traditional quilting, why I got into machine embroidery and why I invested in my quilting frame. Putting all this fabric bulk through the sewing machine while keeping the layers taught is nie on impossible. That is why I bought the quilting frame I the first place. But there is no space in my current studio and, as I said, I wanted to just quilt in the ditch not to cover the quilt in a lot of freehand quilting.
At this point it's probably worth telling you what moment of madness set me on this task.
Well, I have this vintage quilt Son No 1 picked up in America.
It lives on one of the guest beds I use for work colleagues who come to stay. ( I have been running a bit of a work based B&B, but that's another story).
Son No 1 borrowed this quilt. It looked like I wasn't going to get it back! I had to work hard to persuade him that really it was mine.
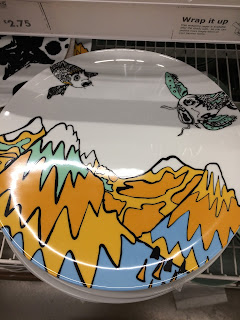
Now Son No 1 had a commission from IKEA and designed the Spridd range for them. It was a limited edition range which hit stores in February 2017 (Australia in November 2016).
As you can see, it was loud!
And included crockery as well as all things fabric.
And the fabric did include T-shirts and, believe it or not tents. However, apart from on the web I never saw a tent. I believe they just flew out!
Sadly, it was a one off range and not repeated. Once it had gone it was gone for good (and last time I ventured into IKEA in Milton Keynes it really had gone! - nothing to be seen)
Anyway, this explains the choice of a Spridd cushion cover. And I thought, in a mad moment, if he wants a quilt I will make him one!
Hence this project.
Back to the quilt wrangling! I relocated the sewing machine to the dining room table ( more space to wrestle with all this fabric). That made it a bit easier and indeed I began to add more quilting than originally planned, following the pattern to guide some liberal quilting. I find the texture with denser quilting more pleasing somehow. I think that's why I like free machine quilting.
So I wrangled, and I huffed and I puffed! And then I put the darn thing down for several months.
And then I picked it up again, put on a black binding and started to neaten off all of the loose threads.
Tedious! So I put it down again for a few more months!
And then finally I thought I really had to get the thing finished. So a final major push, loose ends tidied up etc.
And I delivered it this Christmas.
And, well, it was very appreciated!!
Hampshire Open Studios 2018
14 October 2018
It is very remiss of me - I have not shared the adventure that was this year's Hampshire Open Studio.
Let me make amends.
To kick off let me introduce the players.
First on stage is our host - Rob Turner China.
Next, let me introduce you to Jane Willingale of Loudware.
And all the way from Canada, let's give a hearty welcome to Lorna Moffat-Taylor.
And finally, yours truly.
We turned the kiln room into a fabulous display space.
Every spare shelf was pressed into service.
Rob's beautiful and stunning china was displayed in the garden studio.
The weather was not always with us. (A hot dry summer, and it bloomin' rains when we plan for some demos!)
Some of her jewellery uses silver clay. Now, if ever there was alchemy ...
The dry clay shape does not look like much.
Some of us found the demo riveting. Some of us less so!
With silver clay you make the 'shape' and when it is dry you burn off the 'clay' with a blow torch.
Incredible - Jane makes some lovely shapes and she gets them hallmarked at the London assay office.
I did a demo of machine embroidery - but did not take any photos of myself. You will have to take my word for it.
It was an excellent 10 days and thank you to all of our visitors.
And we are doing it all again in November. Date for your diary if you are in the Gosport area. We will be back on the 24th and 25th November.
Subscribe to:
Comments (Atom)


