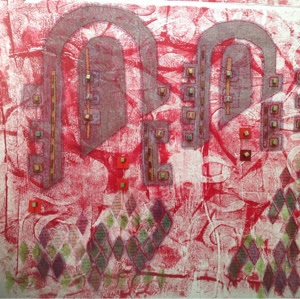
Mark Hearld - An Introduction
29 March 2012
I am a little bit of a fan.
I cannot say that I am a huge fan, because in truth I do not possess any work by Mark Hearld, but I do love his work, plus that of Bawden and Ravillious who he refers to in this little video.
So, if you have nothing else to do, have a little look. His work is lovely.
http://www.youtube.com/watch?v=byG6w2qaWnw&feature=player_embedded#!
And thanks to Jane at Smallbeans for pointing me in the direction of this little video.
Oh, and while you are at it, you might enjoy this one as well.
http://www.youtube.com/watch?v=0sZwzBcjvtE&feature=relmfu
Screen printing with paper templates
24 March 2012
I was up with a lark on Saturday morning and as it was too foggy to set off to walk the dog I decided to have a go at a bit of screen printing using paper templates, though someone wasn't particularly impressed by the delay of his walk.
I saw a video on this on U Tube last weekend - it looked like a fascinating technique.
So I folded and snipped away at pages from the Guardian Weekend magazine (I did this earlier in the week) and then stuck them to my screen with masking tape.
Then I used Textile Medium mixed with acrylic paint as the printing ink. The medium slows down the drying time of the paint so making it a bit more user friendly for screen printing. You mix it with paint using a 1:1 ratio of paint to medium.
I used a decent System 3 paint, and a cheap acrylic from The Works. They both worked just as well.
I used newspaper to pad the work surface and then a piece of calico as a new drop cloth. The first pull adheres the paper to the screen. The video reckoned about 8 -10 pulls per screen with paper. I used it 7 times, after which the edges were beginning to get a bit 'soft and raggedy' and I was loosing the crisp out line of the images.
But I think this technique has real potential.
The last image shows a print done on a piece of previously dyed Evolon fabric.
And just as a contrast, earlier in the week I used cut paper as a stencil and used a markal paint stick on a piece of dry powder coloured paper (the dry powder was applied while the gesso was still wet)
I saw a video on this on U Tube last weekend - it looked like a fascinating technique.
So I folded and snipped away at pages from the Guardian Weekend magazine (I did this earlier in the week) and then stuck them to my screen with masking tape.
I used a decent System 3 paint, and a cheap acrylic from The Works. They both worked just as well.
I used newspaper to pad the work surface and then a piece of calico as a new drop cloth. The first pull adheres the paper to the screen. The video reckoned about 8 -10 pulls per screen with paper. I used it 7 times, after which the edges were beginning to get a bit 'soft and raggedy' and I was loosing the crisp out line of the images.
But I think this technique has real potential.
The last image shows a print done on a piece of previously dyed Evolon fabric.
And just as a contrast, earlier in the week I used cut paper as a stencil and used a markal paint stick on a piece of dry powder coloured paper (the dry powder was applied while the gesso was still wet)
A witches brew
22 March 2012
I have had my first go at indigo dyeing - and it's alchemy!
First of all we all stood around the cauldron like witches.
In the dye bath the indigo is yellow, or it should be so long as you keep the oxygen out. As you can see it was beginning to oxidise.
Then after casting our spell we retrieved the wonderful piles of mystical fabric, which come out of the cauldron yellow, not blue. Exposure to the oxygen makes them turn blue.
It's pure alchemy!
And, in preparation for my next trick, a bit of paper cutting to make repeat patterns.
Mechanical beauty
18 March 2012
I found this. I really do need to stop wandering the web and focussing (bother Twitter) but this is beautiful!
http://vimeo.com/37223496
And, just because I am wandering the web, I found this. But useful! Paper stencils and screen printing.
I think I might try this with the background papers I prepared! I will give it a go and show you what the results are like.
http://www.youtube.com/watch?NR=1&feature=fvwp&v=Ne_Ng4GDaUM
Some musings about pattern
I am feeling a little blocked. We are surrounded by pattern but I am struggling to create something here that I really like.
I have been doodling and sketchbooking like mad - doing something every day - but feel really blocked. Perhaps there is too much going on in my other life (don't ask!).
Yesterday, to give myself a good telling off, I wandered the isles of the local B&Q superstore, Next Home Store and Dwell looking at all the wall papers and cushions on offer. So, how hard can this be!!
 |
| A cake stand being pressed into good use as a drying rack. |
 |
| "Stop all this sketchbooking and blogging - and take me for a walk!" |
Repeat Patterns
15 March 2012
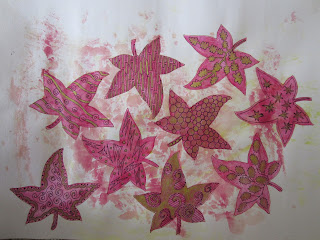
The thing with this latest C&G course is to work on repeat pattern. And actually when you start to set your mind to it, this is not as easy as it first seems. We are surrounded by pattern on fabric, wallpapers and other decorative items, yet to design a pattern is quite a challenge.
My inspiration is leaves - yes, I know it has been done before, but actually perhaps that makes it even more of a challenge.
My starting point was a Zentangle - or organised doodling. And it really does free you up.
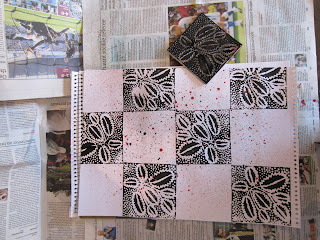
And then I decided to do a bit of printing, making blocks with my materials of choice - sheets of play foam and old polystyrene pizza bases.
Here you can see a couple of blocks using the sheets of foam that you can get from places like Hobbycraft. It is easy to cut with scissors or a craft knife. You might recognise the inspiration for these blocks (well, the ivy excepted) from that original zentangle.
Below are the results, and I am rather pleased.
My inspiration is leaves - yes, I know it has been done before, but actually perhaps that makes it even more of a challenge.
My starting point was a Zentangle - or organised doodling. And it really does free you up.
Then I did a bit of doodling in colour.
And then I decided to do a bit of printing, making blocks with my materials of choice - sheets of play foam and old polystyrene pizza bases.
Here you can see a couple of blocks using the sheets of foam that you can get from places like Hobbycraft. It is easy to cut with scissors or a craft knife. You might recognise the inspiration for these blocks (well, the ivy excepted) from that original zentangle.
Below are the results, and I am rather pleased.
An alternative textile tour of Portsmouth
11 March 2012
Which is another way of saying, this is how I spent my Saturday.
Despite the fact that I am having to miss the next C&G event (shibori and indigo dying) because of work, having lots of sketchbook ideas buzzing around in my head, and lots of horrible looming deadlines for the day job, I still managed to find time to accompany designer son on a trip into deepest darkest Portsmouth to find some reference material for his next collection (and we only just seem to have got the last one out of the way).
Portsmouth, and in particular Southsea, has so much going for it. But I think that the problem is that it is not all in one place and difficult to find if you are not a local.
First of all there is Gunwharf Quays. Actually, to be fair, Gunwharf has sort of put Pompery - Portsmouth to it's friends - on the map. Built on what was an old Vosper and Thornycroft site, it is really a discount shopping village - but by the sea! And it is a fantastic place to be on a sunny Saturday. Unlike many rather depressing shopping venues, Gunwharf does have a bit of pazazz.
Then there is The Royal Dockyard. It would probably be more accurate to say that the Royal Dockyard, or at least the Royal Navy, really put Pompey on the map. If crumbling ships ( think HMS Victory) are your thing, then you would love this place.
But, the mainstream delights of Portsmouth were not our destination. Oh, no. We were headed for the slightly more risque sites of Southsea, and in particular Sabre Sales and the Albert Road.
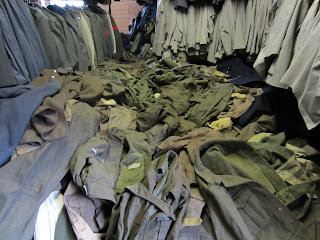
Sabre Sales cannot be described in words. I will let the pictures do the talking, but there is just no where else like it. It is three shops plus the flat above and a warehouse behind on 2 floors stuffed (there is no discernible order) with, well, stuff. But military stuff! And not just British, though that seems to dominate.
Here is one of the quirky windows. (You can just make me out behind).
And here is a pile (literally!) of jumpers and jackets in the warehouse. It is as if the uniforms from Dunkirk have been dropped into the middle of Portsmouth.
And here is a wonderful set of Arctic Longjohns!
And then on the top floor of the flat, Afghan fatigues anyone?
And then piles of boots and shoes in the cellar, if you are brave enough to go down there.
Plus some random firemens helmets!
Billy cans and gas masks
We found parka jackets, combat trousers, combat shorts, bomber jackets and two amazing bags as reference material for the next collection. (And we discovered that NATO has it's own sizing!)
And then, for a bit of sanity (and fuelled by carrot cake ), we strolled the mile or so to the Albert Road.
where you can find quirky junk shops (I want those scissors), amazing second hand book shops, and the wonderful Wedgewood Rooms.
In much haste, but I have just found this....
4 March 2012
Thanks to my transatlantic friend Kit for this link.
She recommends a number of different blogs (and it is so wonderful that so many people out there share their experiences and techniques!) and among them was this one.
I have only just discovered it and will have to pop back later for a better read, but because we have screen printing as a topic on the C & G course I did have a quick read of this tutorial.
So, for anyone who is doing any screen printing any time soon, I think it is worth popping by Sew Sew Art for a quick read, and not least an explanation as to why soda ash is a must in dyeing!
Transfer Dyes
3 March 2012
I have a bit of a love hate relationship with Transfer or Disperse Dyes.
I love some of the work other people produce with Transfer Dyes (Angie Hughes, or the ladies doing fabulous things at Morley College) but I don't love what I have done in the past.
Part of it may be the frustration of using the domestic iron (the heat press at Morley sounds fantastic - I am green with envy).
But Transfer Dyes (or to be more accurate, Transfer Printing) is on the agenda with the City and Guilds course so last week saw me re-kindling my relationship with Transfer Printing.
Actually, the experience was not so bad, though I cannot imagine how I can use this technique to produce a consistent piece of 1m of fabric.
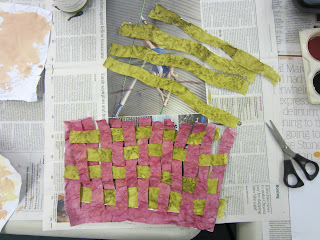
Because I have used this technique before I tried something a bit different. I crunched the paper before painting it. I used Leaf Green and Wine Red (shown below).
Then I cut the papers into strips and 'wove' them.
Then I wrestled with the domestic iron! Actually the results, though not consistent, are not so bad (that is the printed fabric on the right hand side). I used a teflon sheet under the paper when I ironed it and protected the iron with parchment paper. But as you can see, although I was convinced that I had used constant pressure, the is a gradient of effect on the fabric.
Meanwhile others in the group were experimenting with some different techniques. I will be interested to see how this comes out - applying the transfer dyes to the paper with a dry brush.
Subscribe to:
Comments (Atom)


