Tips for finding inspiration
26 December 2016
We all have dry patches. Sometimes it seems that my own dry patches go on for weeks.
So posts like this can be very useful!
http://www.artistsnetwork.com/new-articles/technique-tuesdays-10-tips-for-finding-inspiration
So posts like this can be very useful!
http://www.artistsnetwork.com/new-articles/technique-tuesdays-10-tips-for-finding-inspiration
I particularly like this post because it is varied and practical and warns against always relying on the internet! Get out and look at art! Brilliant.
I hope you are not having a dry patch but if you are book mark this link for both eye candy and assistance!
I hope you are not having a dry patch but if you are book mark this link for both eye candy and assistance!
Quick idea - gift tags
21 December 2016
Christmas is sneaking up on me. As always, December slides past me in a complete rush, and all my best intentions to be on top of everything fall by the wayside.
And this year it's tough to feel Christmassy with all the horrendous things going on in the world and the whole looming Brexit mess and the next incumbent of The White House. But hibernation for a decade isn't an option so here's an idea for some quick and effective gift tags for you.
I used bought heart shape tags. Pre cut with a small hole and made of white card. I got mine in Hobbycraft. (They do other shapes too)
http://www.hobbycraft.co.uk/white-heart-tags-7-cm-30-pack/577657-1000
No great design input - I scribbled over the tags with neo colour water resistant crayons then sprinkled on faithful Brusho inks.
Spritz with water then leave to dry.
And then paint with Fresco Paint Metallic Glaze ( paint on very lightly - Brusho will run again if it gets wet so you want to quickly and gently just coat the tags to avoid to much re- activation).
And you have yourself a rather classy tag. I used blues but of course this would be fab with more seasonal reds and glitter!
Handprinted, Bognor and Lisa Hooper
18 December 2016
Here in Blighty there is a very useful supplier of materials and general goodies for all things printmaking, including Gelli plates.
They also have a lovely website.
Based outside Bognor Regis (which is such a wonderful name for a place - and infamous for where King George the V is reported to have said "Bugger Bogner" shortly before his demise) Handprinted is run by a textile artist. So what's not to like!
Anyway, they also run a blog and recently featured the work of Lisa Hooper.
Now I love prints and was particularly taken with the work of this artist, previously unknown to me. And just look at that printing press!
http://www.handprinted.co.uk/ramblings/meet-the-maker-lisa-hooper
They also have a lovely website.
Based outside Bognor Regis (which is such a wonderful name for a place - and infamous for where King George the V is reported to have said "Bugger Bogner" shortly before his demise) Handprinted is run by a textile artist. So what's not to like!
Anyway, they also run a blog and recently featured the work of Lisa Hooper.
Now I love prints and was particularly taken with the work of this artist, previously unknown to me. And just look at that printing press!
Pop over to Handprinted to have a look at their goodies and also the Blog about Lisa Hooper.
http://www.handprinted.co.uk/ramblings/meet-the-maker-lisa-hooper
Lampshade making tutorial
15 December 2016
In my post about lampshades here, I said I would share a lampshade making tutorial with you.
I could have done this myself, but I am not geared up for filming (lots of artists are and I admire them, but my own films are a bit, well amateurish! And there are some great tutorials out there.
I got my supplies from Dannells - they have fantastic kits to get you started and also the component parts once you get going. And the very best double sided tape I have ever come across.
Here is their instruction video for a basic drum lampshade.
Of course this uses a commercially available fabric. Which is absolutely fine. But the basic principle of making a lampshade offers lots of possibilities, such as:
- Embroidered fabrics or papers (as I did)
- Hand printed fabrics (I know that Miesje Chafer in Eastleigh has made lampshades from her own printed fabrics, but there is nothing on her website - still worth a look though)
- Use some sketch book designs and get them printed onto fabric. If you are in the UK then Laura Kemshall offers a fabric printing service.
- You could experiment with patchwork but I suggest experimenting a bit and shining light through the fabric as the seams will show when the light is turned on and might not give you the effect you want.
Happy lampshade making.
Lampshades - it's been a production line
11 December 2016
This story begins back here, when I was experimenting with new inks. And maps!
I had a plan and that plan has now come to fruition.
But, dear reader, let us recap.
You may recall I inherited a box of old maps after my dad passed and Mum was having a bit of a purge. She was up for throwing them away, so I volunteered to liberate them and offer them a chance at new life.
I could have left them alone and just cut them up, but where is the challenge in that?
So first up I coloured them with powdered inks - Brusho in this case but for some I also used infusion inks which include a walnut stain giving the colours a vintage feel.
I use the powders dry - sprinkling them into the paper and then spritz with water.
These inks have to be fixed. They are not permanent and if they get wet again will run. So when dry I used a universal fixative to make the colour permanent.
I then made two styles of lampshade using these coloured maps.
First up the closely embroidered shades.
First of all I used coloured papers and foil to collage small organic shapes onto the coloured maps.
Then I used organza to layer over the map.
I backed the organza with Bondaweb.
To make the organza manageable, I used squares and rectangles of the backed organza which I layered over the paper (these were substantial shapes, at least 6 inches on the smallest edge. I did not use little fiddly patchwork organza pieces). I pressed these down onto the maps with an iron in the normal way. Map paper is very forgiving and will happily get wet, dry out again and then take an iron without complaint.
Then I stitched.
And here is the back of one of the maps showing the stitch detail.
To make the lampshades I used kits available from here ( in fact, I only used one actual kit, the company sells the component parts separately. And I have to say they also sell really good double sided tape.)
I will share the tutorial on making up the actual lampshades separately.
Here is one of the finished articles.
I was very pleased with the result.
Next up, much simpler sewing.
Again I used maps coloured with inks. But this time all I did was use larger images cut out of a book which I stuck with a dab of clue just to position them and then stitched in place.
Drum shape and oval shape.
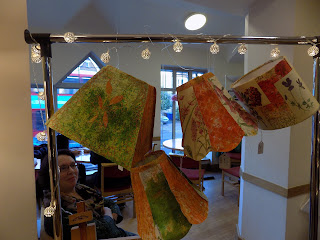
And finally a series of granny lampshades just using stitched papers, though some of the papers were from my stash of decorated papers (texture with gesso then coloured with paints and inks). No embroidery or embellishment st all - I just stitched the panels together.
Now, it's very difficult photographing lights. There must be a knack. I haven't got it.
But you get the gist.
I love all of these I will be market testing them at The Workshop Sale. It will be interesting to see what reaction I get.
Subscribe to:
Comments (Atom)


