PVA glue

The Hand Made Memories Album - another fairly hefty post so you might want to put the kettle on first....
7 April 2014
Again, apologies for a bit of blogging silence.
And a page from my sketch book.

Back to the boxes - in fact there were 3 boxes and I covered them all at the same time.
Brown paper and PVA glue (spread the glue all over the paper - I used an old credit card - and then smooth it down with your hand. You might have a few wrinkles, but that is not the end of the world).


(Sorry about the colour changes here - some photos were taken in daylight and some under artificial light).
Next up a bit of coloured grunge paste.


And the stencil I cut for the last 'Book' I made.

Then I added some detail to the leaves with silver acrylic and a Pistachio green from the Fresco Finish range.

Then I cut out tiny silver foil leaves - it's the silver side I wanted.

And a button/ribbon combo to the front.

I should say that the silver leaves were stuck with matt medium and the whole cover was given a good coating of matt medium. It makes everything feel finished and gives a good finish.
Then I turned to the pages and tags.
I used rag paper for the pages and the same paints as before.


I added pockets to some of the pages.


Here are the book innards - looking a bit like a book (albeit a random book!)


And a recycled envelope for a pocket.


But again I have been packing in the creativity with a tight deadline so something had to give. Blogging v creating. Creating won!
And again ( too many agains, but bear with) said creativity has involved a Boneo box - but shhh - don't tell anyone since this is another present. Am I developing a Boneo obsession? Well as it is the lovely Chris Gray called me Boneo Bird when we met at the NEC. You decide ( though I suspect the next post won't have a Boneo theme, not least because the dog has moved onto Gravy Bones!)
You might want to grab another brew as another bit of a tutorial on how I did this one coming up. Settle down everyone. Are you sitting comfortably?
Right - I'll begin.
And in the beginning there was, yes, you've guessed! A Boneo Box!
And in the beginning there was, yes, you've guessed! A Boneo Box!
And a page from my sketch book.
Back to the boxes - in fact there were 3 boxes and I covered them all at the same time.
Brown paper and PVA glue (spread the glue all over the paper - I used an old credit card - and then smooth it down with your hand. You might have a few wrinkles, but that is not the end of the world).
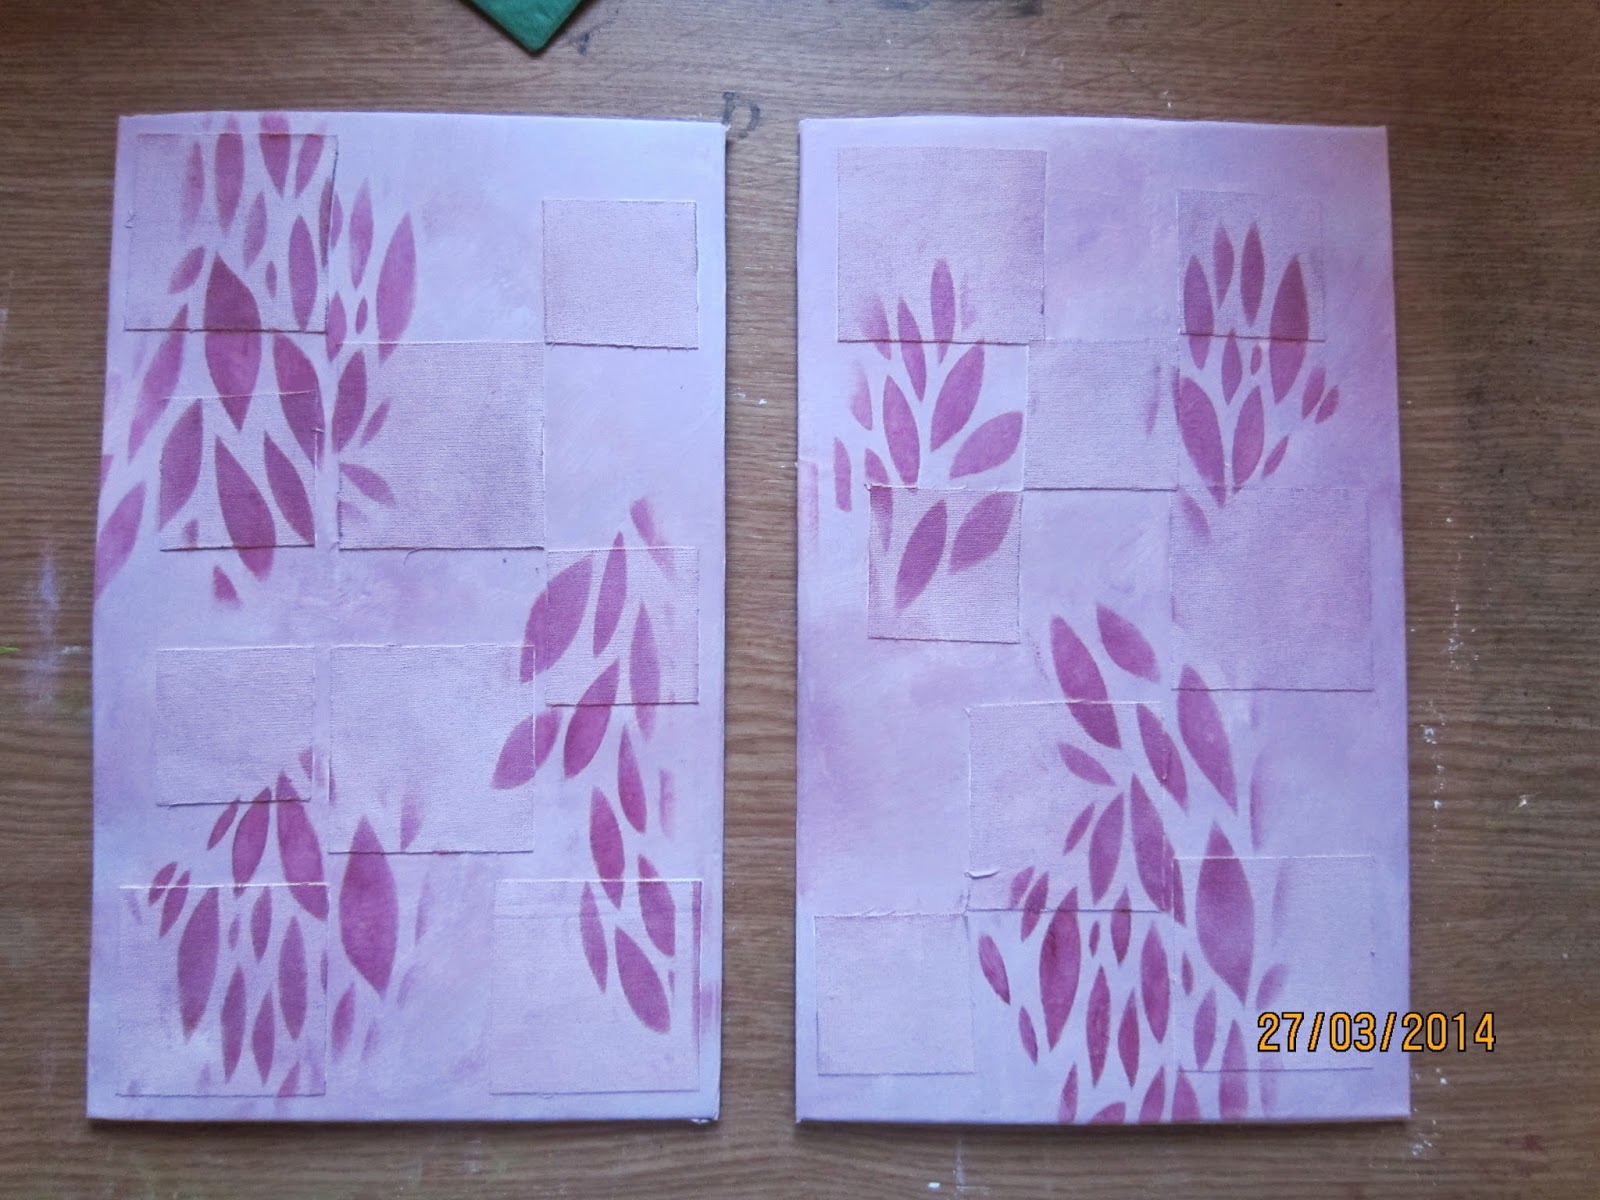
Then, small calico squares (backed with Bondaweb and ironed on to the covers).

Then I applied a coat of white acrylic paint to give me a decent background to work with. I could have used gesso, but the gesso I have has a certain grainy texture which I didn't want. I also did not want to get involved with any sanding between coats. So a white heavy body acrylic works just fine. (I used Daler Rowney)

Then paint - again those lovely Fresco Finish acrylics from Paper Artsy. Pink for a girl.

The background is Blush with a touch of Very Berry.

I used a sponge. Here I am getting the next colours sorted out (Claret mixed into some Blush).

And here is a fab stencil I bought on my last outing to the NEC (which you can read about here).
I have no idea who the retailer was who had this stamp. It was all a bit chaotic. They were in the Hobbycraft gallery, rather than the textiles one.

Then paint - again those lovely Fresco Finish acrylics from Paper Artsy. Pink for a girl.
The background is Blush with a touch of Very Berry.
I used a sponge. Here I am getting the next colours sorted out (Claret mixed into some Blush).
And here is a fab stencil I bought on my last outing to the NEC (which you can read about here).
I have no idea who the retailer was who had this stamp. It was all a bit chaotic. They were in the Hobbycraft gallery, rather than the textiles one.
(Sorry about the colour changes here - some photos were taken in daylight and some under artificial light).
Next up a bit of coloured grunge paste.
And the stencil I cut for the last 'Book' I made.
Then I added some detail to the leaves with silver acrylic and a Pistachio green from the Fresco Finish range.
Then I cut out tiny silver foil leaves - it's the silver side I wanted.
And a button/ribbon combo to the front.
I should say that the silver leaves were stuck with matt medium and the whole cover was given a good coating of matt medium. It makes everything feel finished and gives a good finish.
Then I turned to the pages and tags.
I used rag paper for the pages and the same paints as before.
I added pockets to some of the pages.
Then I bound the pages. I had 8 pages and 4 signatures.
I wanted a different binding to the previous book, which had very loose bound pages so the recipient could, if wanted, actually slip a page out.
I actually did quite a bit of research into page binding techniques, before settling on this one which also uses ribbon. The book had much more stability with the ribbon - which is so pretty and girly. At this point I decided against beads.
Here are the book innards - looking a bit like a book (albeit a random book!)
And the book is a Christening present, for little Charlotte Rose (well, not so much her, but more of an album for her parents to record some happy moments. But drat! I forgot to take photos of the lovely day. Hope others did to stick in the book.)
And a recycled envelope for a pocket.
OK - so now I am getting very ambitious (and this is where I was having all sorts of technical difficulties - but as they say, live and learn) I made a little video of a flick through of the book. First of all I hope this technology works and second of all I hope you appreciate my droning on. Let me know what you think. I cannot promise to do loads of these unless I crack the technical difficulties, but I could try a few more if you like it.
As always, dear reader, thanks for dropping by and I do hope that your tea hasn't gone cold!

This is for Iz
19 January 2014
Isobel Moore reads my blog from time to time and also runs textile courses at Uckfield Community College or Fairwarp Village Hall Uckfield ( which for foreign readers is in the county of Sussex, South of London).


And last of all a detailed leaf pattern from the C&G courses couple of years ago.
Well, she dropped by my blog the other day and mentioned that her class would be doing printing with foam blocks this week.
So for Iz and all her students ( and I have no idea if any of them drop by here) I rummaged through my tin of foam print blocks and assembled some of them artfully on the work table and took a photo.
Iz - hope you and they can get some inspiration.
This first collection has a bit of a Spanish feel. That's a Comb in the foreground.
Randomness , including the block for my Christmas card ( and a couple made from commercial shapes not yet used).
The flower ones have been particularly successful - I used a Sarah Raven catalogue for inspiration, and also the horse chestnut leaf (which had an outing with my mixed media prints just before Christmas).
And last of all a detailed leaf pattern from the C&G courses couple of years ago.
Some of them required intricut cutting. I use small sharp scissors, a craft knife and, sometime, a soldering iron to burn in detail . But this gives off a nasty smell so you can only do that in a very well ventilated area. Not really recommended.
I use pva glue to stick them down, and if just stick them to recycled card (dog biscuit boxes come in very handy).
I love my foam print blocks.

PVA Glue and Screen Printing
4 September 2013
I use quite a lot of PVA glue - and I guess many of us do. It is cheap and easy to get hold of. A quick trip to Hobbycraft or The Range and stocks are replenished.
However, I don't do that much sticking. I do use it to bond tissue papers onto backing fabrics to make that 'backgound' paper that I use a lot, but I also use it as a resist to decorate fabric.
I have had mixed success with this. The first time I tried it the result was spectacular but it took so long to wash (indeed scrub) the glue out that I lost some of the colour.
The second time I used a different glue and it just let the paint seep everywhere - no resist at all!
But I read somewhere that you could use PVA glue to make screens for printing. So I thought I would give it a go.

The glue I used was nothing special at all. But I did decant it into a craft bottle with a smaller hole to control the flow.

Then I took my screen and masked off the edges with parcel tape. This is a commercial screen that came from a kit. I have had it a few years and the whole kit was a present.

You apply the glue to the underside of the screen so that you don't scratch the design as you pull the ink across in the well.

Here is the design. The glue is still wet so you can see it.
Now this process is not for the impatient (Hilary Beattie - are you reading this?) You have to let the glue dry. In my case I left it for a good couple of days. You know when the glue is dry as it is clear and the design is much fainter.
Then I did the printing!
I printed on both fabric (scraps from a previous dyeing session) and paper.
I used fabric printing ink - in has a good consistency. Next time I will try acrylic paint with a retarder.


I did quite a few print runs (I won't bore you with them all). I started with nice clear colours but ended with a muddy brown as I mixed the ink - perhaps on reflection the blue was a mistake so early on in the print run.
Anyway, you get the gist.
Now you can't wash and use the screen immediately because when you wash it you wet the glue again and it goes all white and sticky. At the very end of my session I blasted the the screen with cold water through the 'well'. The ink did wash away and the glue appears pretty much intact, so I will try a second batch (though I suspect there will have been some degradation of the design).
But a good technique I think - and one to try again.

Tuesday morning ramblings!
2 October 2012
On my last post I asked the rhetorical question 'Why do I blog?' -I asked this because lately I have been a bit short on creative time and that can create a slight feeling of internal panic. Asking the question helped put things all in perspective.
And quite recently one of my textile heroes (dear reader, you may be aware if you have been paying attention, that I have heroes) asked her readers if they liked her blog and what should she include in the blog. I read it fascinated, but did not respond - I just thought I would see what, if any, turns she took.
And then yesterday, said blogger - Kit Lang - entered a new blog piece. And wow, what a story! Go and read it!
So yesterday, over a quick coffee in the office, I googled Angelique - the girl behind Kit's blog. And what a fascinating story - and there is a big question - 'Did she even do it?' (Go read Kit's blog to find out what 'it' is)
It seems to me from what I could glean yesterday that this girl, Angelique, was in the wrong place at the wrong time and was a 'problem that some one wanted to solve'. To think that the whole case seemed to hang on the testimony of a 5 year old, and one who only came along a bit later, and then a confession being obtained by the most horrendous torture ( I found a description - I rather wish I hadn't) seems so wrong.
And that got me thinking, how the hell did our ancestors manage to live with any sort of conscience in such times? But they did - and for us all living now we can give thanks every day that we live in a tolerant society - albeit on occasions a flawed one. That applies to the UK and from what I know of Canada, to Canada too. There are still parts of the world where women are treated as chattels, where to be gay is the equivalent of a death sentence, and where to be of a different ethnicity is cause for additional struggle.
Like that other great challenge of our times, climate change, it can all seem a bit 'too big' for us as individuals to address but the work that people like Kit produce reminds us all that there is still a fight to be won.
Who said quilting was just some gentle past time?
On which note I have started to think about my next pieces. I am going to enter the 'Journal Quilt Challenge 2013' run by Grosvenor Shows. The theme is Memories in Black and White.
I'll come back to this topic - it has been milling around in my mind - but last night I thought I would make some backing fabric. So out came the PVA glue, some random wrapping tissue paper, and a bit of old white cotton I had lying about.


Basically, I mix the PVA with water and then spread it onto the fabric (if you paint the tissue it just tears) and then gently stick the tissue down on top. You don't have to be too particular with this, as the wrinkles in the tissue adds interest and texture.
And then I dropped black Brusho ink powder through a tea strainer onto the wet tissue (giving it a bit of a blast with water to help spread the powder a bit).
When it is dry I will cut it up into A4 size.

And finally, don't you just love a conker! (oh, and I'll come back to that image in the background).
Subscribe to:
Posts (Atom)