It actually started Weeks ago but somehow I have neglected to share the process with you. So to make amends let me share with you where I have got to and how I got here.
The quilt is actually going to be made up of four separate panels – three panels on the right hand side of the same size and one long straight on the left hand side. The quilt will be portrait and has to be 50 cm x 120 cm.
Actually, assembling it in small pieces like this is making it very easy to stitch all the pieces are very easy to manhandled through the machine and I'm not struggling with bending the panels under the body of the machine.
As you would expect with a quilt from me I'm using tissue paper. Many weeks ago now (and I'm sorry I did not share this with you at the time) I had a gay old time one Saturday morning spray-painting sheets of tissue paper. You may remember a little while ago I was auditioning paint on this blog well it was that the size that determined the colour that I chose.
As you would expect with a quilt from me I'm using tissue paper. Many weeks ago now (and I'm sorry I did not share this with you at the time) I had a gay old time one Saturday morning spray-painting sheets of tissue paper. You may remember a little while ago I was auditioning paint on this blog well it was that the size that determined the colour that I chose.
I list my favourite Fresco Finish Acrylic Paints watered down in a spray bottle.
Of course doing it like this makes the tissue paper very wet. Handling wet tissue paper is a mare!
So the process was a bit laborious - I would spray a couple of sheets, then leave them to dry on the painting table for about 24 hours.
But the effect was worth it!

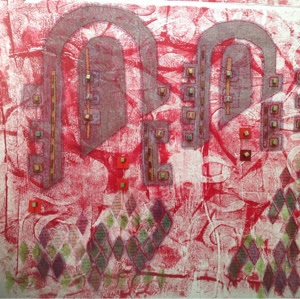
Here is a small sample of one of the panels before stitching showing the painted tissue paper together with some stamped squares and a little gold square of paper stuck on with adhesive. This gold paper is recycled chocolate wrapper.
Rather than using batting I am using acrylic felt. I cut the acrylic felt to size, allowing for a small space between each panel, then using temporary spray adhesive stuck the tissue paper onto the felt.
I folded the tissue paper neatly onto the back. Then to finish the back I have used plain calico which I cut to size and then folded in a hair so that the calico piece was slightly smaller than the felt panel.

You can see the back of one panel above (a few tension issues there!) And hopefully can see what I mean about the neat finish with the calico.
I have used an image which I have used on a number of pieces several times before. This original image was printed with inks onto rag paper using one of the first ever print blocks I experimented with which was made entirely of cardboard.
I have scanned and saved the image on the computer, manipulated it a few times in paint.net and it has appeared in a few pieces.

For this quilt I printed it out on an artificial paper/fabric which I got from the online shop called crafty computer paper. Stupidly I didn't make a note of the fabric - it feels like but isn't bamboo.
As I mentioned above I've also printed using inks and acrylic paint onto the panels and stuck little squares of chocolate wrapping paper.

And now I'm quilting. I'm using one embroidery stitch from the machine catalogue but mostly it is free motion embroidery.
There will be some beading, and there will be much stress as I use a technique that I've only dabbled with to join the panels together.
I'm On-Target! It should be finished on time.
I'm On-Target! It should be finished on time.


This is just lovely, such a lot of hard work has gone in to it. Your sketchbook page is great, we need somewhere to just work things out & if it calms us down, well what a bonus!
ReplyDeleteThanks Emma.
DeleteThis is beautiful. Such soft colors.
ReplyDeleteThanks - it is a lovely green. The whole piece is beginning to come together and I do like it.
DeleteMy goodness, such a lot of work and such a lot of patience! But I would say that the results are certainly going to be worth it!! Can't wait to see the next step...
ReplyDeleteGreat results with the tissue paper! And the back looks as good as the front. :-)
ReplyDeleteHa ha - the quilt police should be happy then!!
ReplyDelete