Valentines Cards (a little bit late!)
25 February 2018
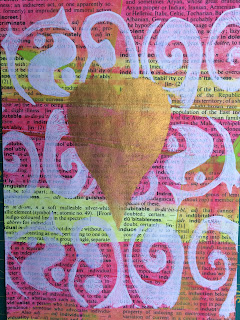
I had a session making Valentines cards. Now I know it's a bit late for Valentines, but bear with me because the technique would work with other motifs (in fact, as well as using a heart motif, I also used a leaf motif - so point proven!)
It's a simple technique - borrowed in part from Julie Fei Fan Balzer. Now, I am sure I have mentioned Julie before. In fact she does not need me to sing her praises. She is a one woman artistic power house!
But she posted a lovely little blog here. Go and have a look.
And I borrowed the idea of masking and printing, but I started with pages I had already inked up. (I always have a stash of papers to pull out when needed). In this case, dictionary pages coloured with a combination of Infusion Inks and Fresco chalk paints.
I cut a couple of stencils from paper. One was a heart, and one was a stylised leaf - you see, I told you it wasn't just about valentines.
I selected a range of papers and trimmed them to fit the card blanks I was using.
For this to work, you do need a fairly simple shape and one that is "connected". Remember, you want to use the shape you have cut our as a mask later in the process.
Despite having a tin full of home made 'stamps' and print blocks, I still felt I needed another one for this project - hence this mess.
In this case I used self adhesive foam sheets from Hobby Craft. In the photograph below the bottom block is the new one I made specifically for this project. The top one is a block made ages ago. I am sure I must have shared it before. I stick the foam onto stiff card - packaging from dog food is ideal I find. Cereal packets etc. are too flimsy while Boneo biscuit packets have enough oomph to take the paint and the cleaning afterwards!
I sometimes work with a craft knife when I use sheet foam to make blocks like this. Alternatively I snip the foam sheet with scissors.
Now, at this point my photography went awol. (I really do need to learn how to set up a little video camera for this sort of thing!)
There were two stages.
First - using the whole sheet of paper as a stencil, I added markel paint stick with a stiff stencil brush.
Second - using the shape cut from the same paper as a mask, I printed over using Fresco Paints and the block I had made.
(Pop over to Julie's blog to see how she does it.)
These were the colours I used (most of the papers were fairly dark and I wanted the pattern to be lighter than the background.)
This gave me a range of papers looking something like this (you can see the shimmer from the paint sticks).
Now, because this was, for the most part, dictionary pages I needed to add a bit of substance if I was to add stitch. So I mounted these papers onto a backing of stiffer paper (an assortment of khardi and other craft papers, also from my supply. I used Hi Tack glue - I find this doesn't make the paper wrinkle.)
And then I got the trusty sewing machine out - newly serviced and cleaned - and stitched the leaf and heart shapes.
And - voila!
The wonder of watercolour
7 February 2018
I've been wandering the web again. And I found this video.
And added rusty red wash to the leaves.
And this last photo does illustrate the possibilities with this technique.
I was vaguely aware that somewhere on my paint trolley there was a bottle of masking fluid.
I rummaged and sure enough, I found a bottle.
So I thought I would try it on a page in the sketch book.
Now, one thing to say is this stuff goes off and I had had this particular bottle for a while. Consequently it did not flow very well and applying it with a brush was far from satisfactory. I think the bottle is only fit for the bin unless I can thin it down slightly. I will have to experiment with water and see what happens.
Anyway, I pressed on. I painted some (rather rough) leaves with the masking fluid. You can see how tricky this was with fluid that did not flow too well. And the process might have been more satisfactory if I'd sketched the leaves in pencil first, or if the fluid was tinted to I could see it more clearly against the white paper.
I then just sloshed on a wash of pale blue.
When dry I painted on a few more leaves to mask just the blue. And that got a bit frustrating due to the claggy texture of the fluid so I just masked off some area. Then I added yellow.
When all was dry I removed the masking fluid.
Then with a black pen sketched more leaves on top.
And added rusty red wash to the leaves.
And then I tweaked the photo a bit to make the colour a bit more acidic.
And this last photo does illustrate the possibilities with this technique.
I actually use the technique of 'masking areas' quite a lot, but usually with white wax crayon on maps when I'm laying down background inks for lampshades. This is a completely different technique as I rub the wax crayon over the map which is on top of a stencil. So this would be called a 'rubbing'.
The idea of using masking fluid as an alternative technique really could be quite exciting. I need better masking fluid and perhaps I could try acrylics which won't reactivate when another wet layer is added.
Lots of possibilities.
The idea of using masking fluid as an alternative technique really could be quite exciting. I need better masking fluid and perhaps I could try acrylics which won't reactivate when another wet layer is added.
Lots of possibilities.
Subscribe to:
Comments (Atom)


