Do you sometimes find that you return to themes and ideas? Things that you have tried once and need to try again? Not quite working in a series (oh, I wish I had the time and space to work in a series and see a whole body of work develop over a period of months) but revisiting a theme from time to time?
Well, I have had the concept of Alchemy buzzing around in my head since 2015. I guess turning base metal into gold is what artists do - take unpromising 'ingredients' and turn them into things of beauty or into work to challenge the senses.
It was back in 2015 that I picked up on Alchemy as a concept but I have looked back through the posts here and I don't think I ever really reported it. The only reference to the piece of work I did then, Alchemy I, is here where it just gets a passing reference in a post about a studio re-shuffle.
(Side note: my studio before this was definitely the best studio I have ever had. Bloody cold in winter and shocking lighting - so not actually the best then, just the one with the most potential - but opening onto the garden and great space. I was only there 2 years, and as with all rented properties, there is only so much you can do to make a space work for you because of the limitations of renting.)
Any way, my first piece - Alchemy I.
I did not take any photographs to capture the work in progress but it was a monoprint tissue background with additional collage and stamping.

The vessel was made separately and printed with lettering and the flames are organza and free motion embroider with hand beading done on soluble fabric which has been dissolved.
I mounted it myself (and painted the edge of the inner mount gold) as I wanted some of the stitched layer to go over the mount.

Since this photo was taken (a little while back) this has been mounted into a frame.
So, onto Alchemy II. The starting point for this piece were some science pages from an old book sourced from a charity shop and gradually being used for collage and printing.

Then I made myself a very simple stencil from card and began to add flames (gesso and inktense pencils here).

Then I stamped into tissue and collaged the tissue onto the work. You will see that I also did a very simple wash of yellow where some of the background white was showing through. Again I used inktense pencils for this. I started off liking the white, but really it would probably have been better, on reflection, to have put a wash of colour over the whole paper before I started.

Next I turned my attention to the vessel. I used some hand coloured vilene (again inktense) mounted onto Pelmet Vilene.
The 'ribbon' was from my stash. This is nylon organza captured between soluble film, stitched and then cut and burnt with a soldering iron to give a bit of texture. I must have had this bit quite a few years because I haven't done any of that for a while.

The next layer of flame uses foil sweet wrapping. Here placed before sticking down.

And I added extra embroidery with metallic thread to the vessel. I used Modge Podge for this piece. I do like the way it sticks but it does dull the metallic sheen from the wrappers slightly.

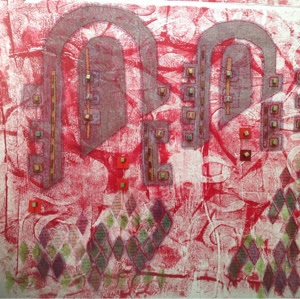
Next the top layer of flame. Now at this point it is having a rest, because I cannot decide if it needs more. I also need to find a mount because the edge is distracting. I should say that neither the top flames or the vessel are stuck down at this stage.

I apologise that the photo is on it's side but you can see the wonderful transparent effect of the various layers. I love using tissue paper for this reason. If you are wondering, I used Fresco Acrylic paints for the lettering and a commercial stencil I have had for ages.

Now, there is still some way to go with this piece. I think the vessel needs a bit more work and I am mulling over whether to add more flame. So I will leave it there but will let you know how it developes.


What an interesting progression of transformation. I loved the foil leaves, then was totally smitten with the organza flames. Mull and keep going!
ReplyDeleteI am. I think a couple more flames needed. It's nearly there ( oh, and I've tinkered with the vessel a bit!)
DeleteOooo love this so much x
ReplyDeleteMrs B - When you say you love something my heart skips a little beat! Thank you so very much.
DeleteStill not actually finished. But this week I will do the finishing touches and assemble the final piece. I am aiming to release this at Bucks Art Weeks and that starts 9th June!