Photography - setting up a back drop
11 March 2018
I have mentioned before how tricky I find photography - as in photographing what I make.
Previously I have rigged up a sheet to take photos - not ideal! In fact, quite a faff!
So my friend Rob (he of Rob and Andy) suggested a window blind I could simply 'pull down' to create a backdrop.
So simple in principle, but not so easy to execute!
I went on a quest for a plain white blind with fabric thick enough so you could not see a hint of what was behind.
And it seemed like an impossible quest. Pretty much everything was either patterned or only semi opaque.
And then the hanging mechanisms began to do my head in.
And I nearly gave up.

But then, in Dunelm, I had a brainwave!
Dunelm sell black out curtain lining off the roll and by the meter. That, I thought to myself, could work - especially if I also take a cardboard roll to roll it on and then, somehow, hang it from the ceiling.

And then the whole thing got even easier because I selected a roll that was nearly finished (there were only a couple of meters left on it) and ended up with the fabric I needed and still attached to the original cardboard tube.

This tube I hung from the studio ceiling - or rather off the roof joists (its a simple conservatory with a polycarbonate roof mounted on timber supports) - a slightly Heath Robinson affair with rings I found in my tool box and fishing twine threaded through the tube so that it can be 'rolled' by hand.

And it works - it can be dropped down and onto a table top and then rolled back up when I have finished.

It doesn't quite have the finesse of a proper studio set up (or even a blind - it's a bit of a fiddle to rewind) - but it works! And it did not break the bank!

Though I still have to work out how to photograph framed pictures without getting some reflection in the glass.
Edinburgh mini break
7 March 2018
Only it wasn't - a mini break, I mean.
It was a work trip - I was there with the day job.
And it was a bit of a flying visit - not a lot of time for anything much other than day job stuff.
It has been quite a few years since my last visit to Edinburgh.
I travelled up by train - very civilised and beautiful views as we passed through the Borders.

I arrived at Waverley Station - that had had a bit of a face lift since my last visit (which, let's face it, was a while ago!)


If you are interested, it was called Eden Locke. I booked it without really knowing what it was - I got a late deal and really only chose it for the location.

The second day I had two business meetings. But, there was a bit of time between them. So I took the opportunity to explore an old haunt - The Grassmarket. This is a historic space, used for centuries as a location for horse and cattle markets and also, rather gruesomely, public hangings. It nestles under the Castle and is easily, if precipitously, accessed from The Royal Mile.
As a teenager, I lived at Stirling. I would take the train into Edinburgh and explore the alleys and tenements off the Royal Mile. That is how I discovered The Grassmarket and the stunningly picturesque West Box and Victoria Street that lead off it.
I remember it being quite 'alternative' - a lingering waft of joss sticks and a bit hippy.
I must admit I was prepared to be disappointed and for Costa Coffees and Starbucks to be prevalent - but I was presently surprised. The joss sticks may be be burnt out, but it was still full of quirky, independent shops.


And Edinburgh was as I remembered it - full of steps.


It was a work trip - I was there with the day job.
And it was a bit of a flying visit - not a lot of time for anything much other than day job stuff.

It has been quite a few years since my last visit to Edinburgh.
I travelled up by train - very civilised and beautiful views as we passed through the Borders.

I arrived at Waverley Station - that had had a bit of a face lift since my last visit (which, let's face it, was a while ago!)
Waverley Station is right in the middle of Edinburgh. Princes Street is on your right as you exit, and the Castle and Royal Mile are on your left.
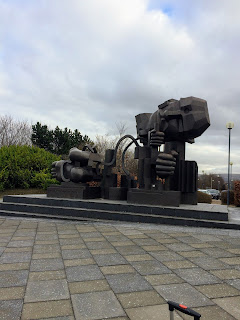
But I had to turn round and get onto a local train out to Edinburgh Park station - because my first meeting was out of the city.
And it was there (not right outside the station but in the business park adjacent to the station) that I came across this stunning sculpture.

I later discovered that this piece is by Sir Eduardo Luigi Paolozzi - a Scottish sculptor and artist, though clearly of Italian heritage.
I am not really familiar with Paolozzi, but it seems he was born in Leith, a part of Edinburgh, so was a real local.
I discovered this is called 'The Wealth of Nations'.
On the sculpture is the following Einstein quote:
"Knowledge is wonderful, but imagination is even better."
There was only enough time to photograph the piece, and I did not get the chance to explore it from all angles. I had a meeting to attend.
Back to central Edinburgh - I was staying in a hotel just off Princes Street. And as I was wandering around trying to find the hotel (note to self - don't rely on just the post code! Use the address!) I wandered past the Oxford Bar. It was getting late, photo opportunities were limited and I was on a mission, so if you squint you can make out the sign in this photo.

But it exists! And that was a surprise to me.
Now, you will be wondering why I am mentioning a rather unassuming little drinking hole tucked down a small lane behind Princes Street. But if you are familiar with John Rebus, the detective at the centre of the Inspector Rebus series of novels by Scottish writer Ian Rankin, then you will have heard of the Oxford Bar. I had just assumed, like Rebus himself, that the Oxford Bar was a fiction.
But I did not stop and investigate.
Instead, I had to find my hotel room - which turned out to be a rather lovely and well appointed little self catering apartment. That was a bit of a surprise. And ideal for a longer stay. But I was only in Edinburgh for one night.


The second day I had two business meetings. But, there was a bit of time between them. So I took the opportunity to explore an old haunt - The Grassmarket. This is a historic space, used for centuries as a location for horse and cattle markets and also, rather gruesomely, public hangings. It nestles under the Castle and is easily, if precipitously, accessed from The Royal Mile.
As a teenager, I lived at Stirling. I would take the train into Edinburgh and explore the alleys and tenements off the Royal Mile. That is how I discovered The Grassmarket and the stunningly picturesque West Box and Victoria Street that lead off it.
I remember it being quite 'alternative' - a lingering waft of joss sticks and a bit hippy.
I must admit I was prepared to be disappointed and for Costa Coffees and Starbucks to be prevalent - but I was presently surprised. The joss sticks may be be burnt out, but it was still full of quirky, independent shops.


And Edinburgh was as I remembered it - full of steps.

It was a flying visit and has whetted my appetite for more - I must return.
And to top it off, when I was sitting with other passengers waiting for the train home from we were treated to a wonderful, impromptu piano concert.


Sketch book page with Brick pattern
3 March 2018
Another little page from my ongoing sketch book - the one with a floral theme.
But this time a little bit of collage.

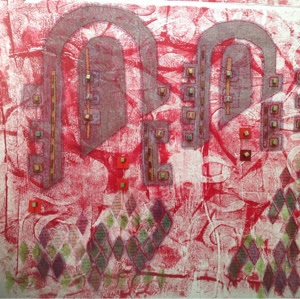
It started with this print block.

You may remember I had a pretty productive Sunday a few weeks ago. This very simple print block was one of the outcomes of that session.
So, first up printing onto a blank page. In this case I used koh-i-noor inks from a palette - applying it to the block with a brush.

Then a simple wash of pink/pale red.

I highlighted the bricks with a pen.
Then I added ivy leaves - snipped from a painted book page (one of the many books from my stock of charity shop book finds - chosen for their paper, sometime for their words and sometimes for their pictures).

I use Hi- Tack glue - I find it does not make paper wrinkle.
And finally flowers, also from a painted book page.


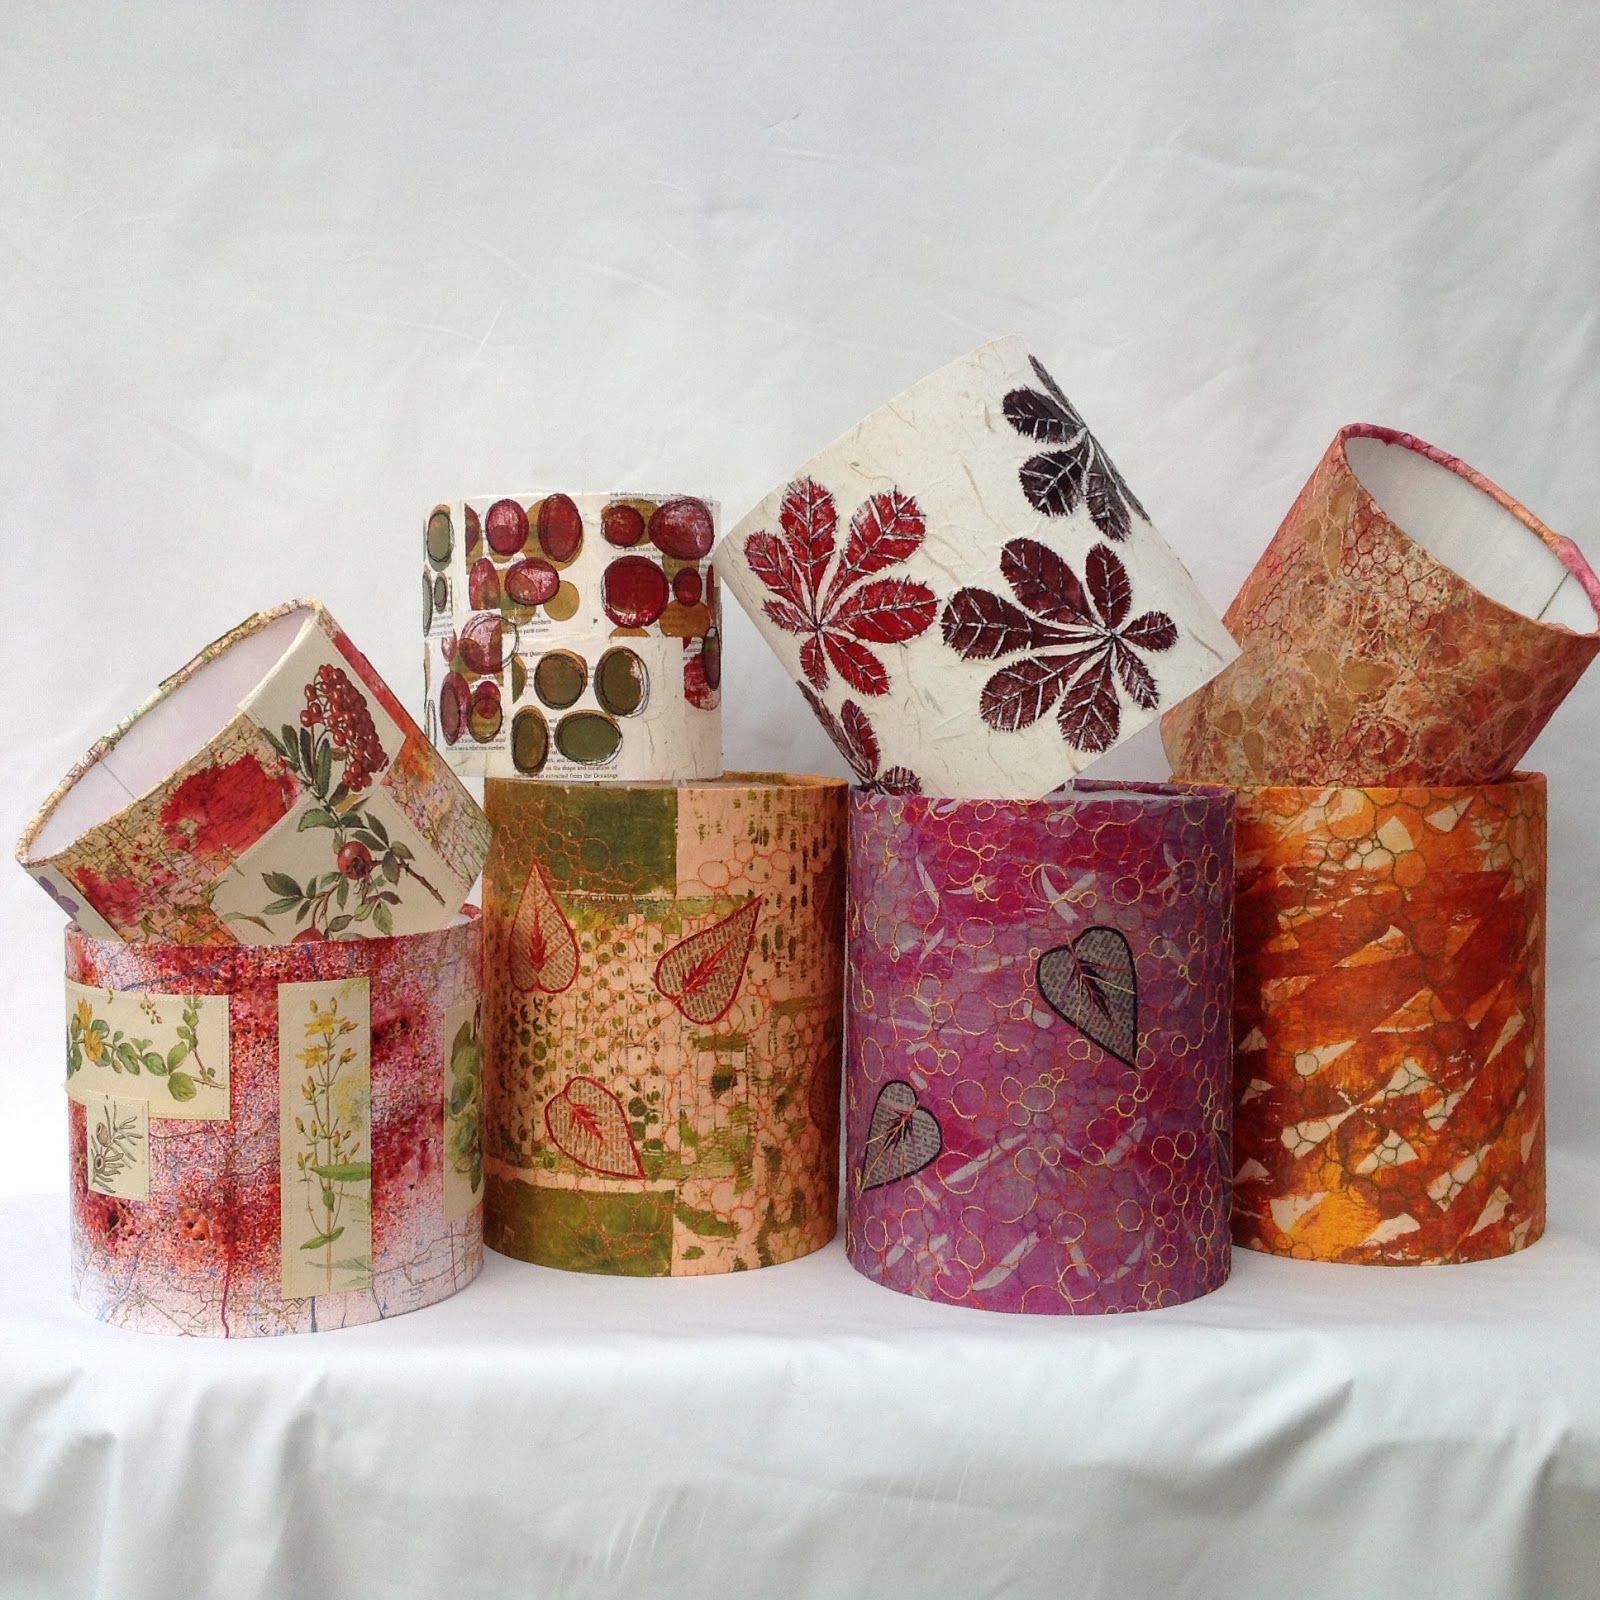
Valentines Cards (a little bit late!)
25 February 2018
I had a session making Valentines cards. Now I know it's a bit late for Valentines, but bear with me because the technique would work with other motifs (in fact, as well as using a heart motif, I also used a leaf motif - so point proven!)

It's a simple technique - borrowed in part from Julie Fei Fan Balzer. Now, I am sure I have mentioned Julie before. In fact she does not need me to sing her praises. She is a one woman artistic power house!
But she posted a lovely little blog here. Go and have a look.
And I borrowed the idea of masking and printing, but I started with pages I had already inked up. (I always have a stash of papers to pull out when needed). In this case, dictionary pages coloured with a combination of Infusion Inks and Fresco chalk paints.

I cut a couple of stencils from paper. One was a heart, and one was a stylised leaf - you see, I told you it wasn't just about valentines.
I selected a range of papers and trimmed them to fit the card blanks I was using.
For this to work, you do need a fairly simple shape and one that is "connected". Remember, you want to use the shape you have cut our as a mask later in the process.

Despite having a tin full of home made 'stamps' and print blocks, I still felt I needed another one for this project - hence this mess.

In this case I used self adhesive foam sheets from Hobby Craft. In the photograph below the bottom block is the new one I made specifically for this project. The top one is a block made ages ago. I am sure I must have shared it before. I stick the foam onto stiff card - packaging from dog food is ideal I find. Cereal packets etc. are too flimsy while Boneo biscuit packets have enough oomph to take the paint and the cleaning afterwards!
I sometimes work with a craft knife when I use sheet foam to make blocks like this. Alternatively I snip the foam sheet with scissors.

Now, at this point my photography went awol. (I really do need to learn how to set up a little video camera for this sort of thing!)
There were two stages.
First - using the whole sheet of paper as a stencil, I added markel paint stick with a stiff stencil brush.
Second - using the shape cut from the same paper as a mask, I printed over using Fresco Paints and the block I had made.
(Pop over to Julie's blog to see how she does it.)
These were the colours I used (most of the papers were fairly dark and I wanted the pattern to be lighter than the background.)

This gave me a range of papers looking something like this (you can see the shimmer from the paint sticks).


Now, because this was, for the most part, dictionary pages I needed to add a bit of substance if I was to add stitch. So I mounted these papers onto a backing of stiffer paper (an assortment of khardi and other craft papers, also from my supply. I used Hi Tack glue - I find this doesn't make the paper wrinkle.)
And then I got the trusty sewing machine out - newly serviced and cleaned - and stitched the leaf and heart shapes.


And - voila!

The wonder of watercolour
7 February 2018
I've been wandering the web again. And I found this video.


And added rusty red wash to the leaves.


And this last photo does illustrate the possibilities with this technique.
I was vaguely aware that somewhere on my paint trolley there was a bottle of masking fluid.
I rummaged and sure enough, I found a bottle.
So I thought I would try it on a page in the sketch book.
Now, one thing to say is this stuff goes off and I had had this particular bottle for a while. Consequently it did not flow very well and applying it with a brush was far from satisfactory. I think the bottle is only fit for the bin unless I can thin it down slightly. I will have to experiment with water and see what happens.
Anyway, I pressed on. I painted some (rather rough) leaves with the masking fluid. You can see how tricky this was with fluid that did not flow too well. And the process might have been more satisfactory if I'd sketched the leaves in pencil first, or if the fluid was tinted to I could see it more clearly against the white paper.
I then just sloshed on a wash of pale blue.
When dry I painted on a few more leaves to mask just the blue. And that got a bit frustrating due to the claggy texture of the fluid so I just masked off some area. Then I added yellow.
When all was dry I removed the masking fluid.
Then with a black pen sketched more leaves on top.
And added rusty red wash to the leaves.
And then I tweaked the photo a bit to make the colour a bit more acidic.
And this last photo does illustrate the possibilities with this technique.
I actually use the technique of 'masking areas' quite a lot, but usually with white wax crayon on maps when I'm laying down background inks for lampshades. This is a completely different technique as I rub the wax crayon over the map which is on top of a stencil. So this would be called a 'rubbing'.
The idea of using masking fluid as an alternative technique really could be quite exciting. I need better masking fluid and perhaps I could try acrylics which won't reactivate when another wet layer is added.
Lots of possibilities.
The idea of using masking fluid as an alternative technique really could be quite exciting. I need better masking fluid and perhaps I could try acrylics which won't reactivate when another wet layer is added.
Lots of possibilities.
Subscribe to:
Posts (Atom)