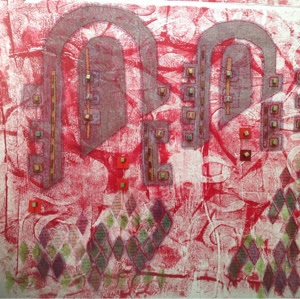
I made another print block, I do love a print block, this one with an old pizza base rather than with play foam to create a bit of texture.

This was so simple to make. Just roughly cut with a pair of scissors and stuck onto a bit of random card with PVA glue.
Then I mixed a bit of black acrylic paint with some green paint.
And I printed some samples.

Very pleased with the result - the texture of the pizza base is just what I was after.
So I went ahead and printed the image onto the 'horizons' pieces I am working on.


If you have just dropped in, you might want to see the other entries on the developments of these pieces here and here and here.
And, I am going to link this to Nina-Marie's lovely blog. As well as her own work, she has a nifty link up and you can find other inspiration there as well. Or just wander around her lovely blog.


Fabulous!
ReplyDeleteI'm looking forward to watching your progress!
Thanks for your comment and for dropping by!
DeleteThe key is going to be how I 'blow this up' - my plan is to make a jpeg and then get it digitally printed onto a large piece of fabric and then 'whole quilt' it.
New departure for me and what I don't know is how the 'imperfections' will translate to a large format.
ohhh I love how you made the stamp - smartie!!!
ReplyDeleteUp-cycling!! It's all up-cycling. The pizza base gives a bit of texture, which is what I was after.
DeleteSo cheap and easy to make!
I must try something similar as a collograph print plate rather than as a block. Lots of potential still to explore.
Thanks for dropping by.
Great idea and so creative - can't wait to see the progress.
ReplyDeleteHello and thanks for stopping by.
DeleteI have to decide if I need to do more with this now or wait until it is printed and add the detail then.
This will be fun to follow.
ReplyDeleteThanks for stopping by. Yes - now got to decide if I move it to fabric or if I should stick with the paper for a bit longer.
DeleteOh MY Goodness...WONDERFUL!
ReplyDeleteWell thank you so much.
DeleteAnd thanks for stopping by.
Great to see your process......excellent! Very effective
ReplyDeleteThanks - still a long way to go. Hopefully going to a show today (weather permitting since we have a ridiculous snow fall here and we Brits struggle with snow at the best of times) to get a bit more inspiration.
DeleteI want someday to do what you are doing. I guess I just need to take the leap! It's lovely.
ReplyDeleteFor me it was 3 great tutors who helped me leap - the Kemshalls (Linda and Laura), Angie Hughes and Brenda Boardman.
DeleteFinding them and learning their techniques - not so much their textile techniques but their design techniques, really took me to the next level.
Thanks for stopping by.
This is going to be really interesting on fabric. I find your process interesting as well, first working on paper and then printing onto fabric. You've made me stop and think!
ReplyDeletebest, nadia
This will be a first - it will be interesting to see if it works out.
DeleteThanks for stopping by.
well, this is just downright fun.
ReplyDeleteI am enjoying the process. It's new for me so the finished piece will be interesting too.
DeleteThanks for stopping by.
Very cool. Speaks of antiquity....
ReplyDeleteIt is based on an amazing ruined palace in Southern Spain. When the rest of Europe was in the Dark Ages, Andalucia under the Moorish control of Northern Africa, was a very cultured place. We all know of the Alhambra at Granada, but this ruin is all that is left of an earlier palace complex. I love that part of the world.
DeleteThanks for stopping by.
Oh wow - this looks really really great !!! Something I think I need to try ;-))
ReplyDeleteWait till you see the finished piece, though the Kemshalls use this technique frequently. Let's see how I get on. I've got to master the technical bit first of scanning the picture to a decent resolution suitable for printing.
DeleteThanks for your comments.
Hi there, thanks for the comment on the blog about Procion P. There is a little bit of soda ash added to the Procion P dye mix, but only about 1/4 tsp to 50mls of dye mix. The dye is then fixed by steaming the cloth for about 20 minutes. We are lucky to have a bullet steamer at Morley College, but it is possible to improvise with a colander and a pan of water.
ReplyDeleteAh - so you put the soda ash in the 'paint' rather than on the fabric.
DeleteI have set silk paint with a home made gizmo on a cooker top - I guess a similar approach would be needed.