It's been a while since I've made a 'book' and I have a bit of an itch.
There is so much going on ( quilts, lampshades, sketchbooks) but I felt I really needed to start another handmade book - or two.
This photograph sets out my base ingredients for the covers - Boneo dog biscuit boxes, brown paper and calico.

I find card from boxes such as dog biscuit boxes is better than the more flimsy cereal boxes. It needs to be tough enough to take the glue and to dry without curling.
I always cover the box with brown paper. It does wrinkle slightly (despite using a brayer to smoothe the paper down) but the slight texture is what I want.

I then use calico to add a bit more texture. I don't want raised areas - just subtle texture.

There is no mystery to the glue I use - I can't get my head around the various brands of PVA on the market, but this Hi-Tack seems to do the trick.

And it's the same with all the various brands of gesso. Does anyone have a favourite gesso and if so, why? I just move from brand to brand and then forget the benefits of the previous brand. This particular one seems very smooth.

Once all this wet media is dry it will be time to add a bit of colour - and possibly a bit more texture with gesso through a stencil. I will mull on that.
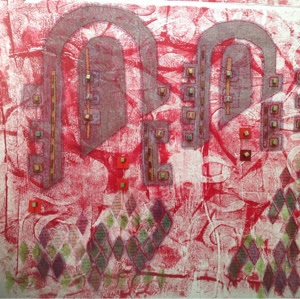
Meanwhile I've been going some thought to the pages. The colour palette just a seems to present itself. Here I have mono printed some dictionary pages using a gelli plate and Fresco Finish acrylic paints, and then added Infusion inks to meander their way across the paper.


I've also found some tags. I decorated these a while ago and they have been waiting for this moment I feel.

Then I started to build up pages (here I am using beautiful textured paper acquired at an artists 'garage' sale, monoprinted with acrylic paints) and the leaves are painted vintage book pages stitched with free motion embroidery.

Vintage book page backed with wadding for 'texture' and lift (will add interest to the final assembled pages)


Tissue paper spray painted with highly diluted acrylic paint. This was actually in my paper stash from a couple of years ago.

And it is all beginning to take shape.


I leave you suspended here. I will be back with the next stage. I need to gather my thoughts at this point. That, and tidy up!


Looking very intriguing. If you did want a smooth texture of the paper on the cardboard, our tutor at Morley, Debbie Brown, recommended the following: spread PVA glue thinly over the surface of the cardboard; let it dry thoroughly ( thoroughly - in capital letters); place the paper that you want to stick on the card, on top of the surface with the dried glue; iron the paper with a medium iron on to the card, then trim and wrap around the other side.
ReplyDeleteI am aware of this technique particularly for use with fabric. Not tried it with brown paper but of course it makes sense. That said I do rather like the texture the slight wrinkles make.
DeleteLooks very interesting - can't wait for the next post!
ReplyDeleteHello Celia - well thank you. I am cracking on and must update everyone.
DeleteLooking great already! Will it be an ideas book or are the pages most;y complete?
ReplyDeleteHopefully they will be complete. I want it for Open Studios in June - something a bit interactive. But there may be one or two gaps.
DeleteGreat information and inspiration. Looking forward to more.
ReplyDeleteWell thank you so much.
Deletethis is a great blog very clear photos of your work. I like Golden Gesso as it has a thicker feel
ReplyDeleteSo lovely to watch your work evolve, thanks for sharing xxx
ReplyDeleteYou're such a tease! But boy, do I understand that need to pause before continuing. Thanks for the extra info on how you prepare the cover.
ReplyDelete