
But I was on a mission so not all stages of the process were photographed.
But I started with an old map - in this case an old street map of Bristol.

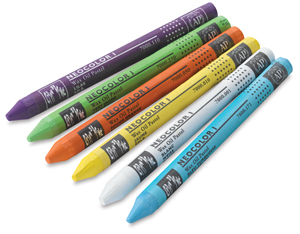
Then, using Neocolour Wax crayon in white I rubbed a pattern over the map (using a stencil underneath to make the rubbing). Now, I admit, you can't really see the street map underneath in this photo but trust me - it is there!
(In this case I used the white crayon because I wanted a simple colour palette and the street map was just black printed on white. I wanted more of a resist than an additional colour. On other lamps I have used the coloured wax crayons.)
The wax crayon acts as a resist for the next layer - the ink.
Be aware if you fancy having a go at this. There are two types of Neocolour crayon - Neocolour II is watersoluble. They look pretty identical to me but I only have the water resistant ones, and they're the ones you need for this technique.
Also, I have used just a simple Crayola wax crayon for this technique - the results were just as good thought there will be less pigment in the Crayola.
For the ink I used 'Infusions' powder ink in Sunset Beach.


There is little science to this. The powder is sprinkled on and then spritzed with water. Then you let it 'do its thing'.
After that I have found it is best to set the ink. Infusions will run again if they get wet - they are not permanent, unlike Inktense pencils. And while I won't be putting my work out in the garden I think it is best to set it as much as possible. I used a spay fixative - a standard one suitable for paints and pastels etc.
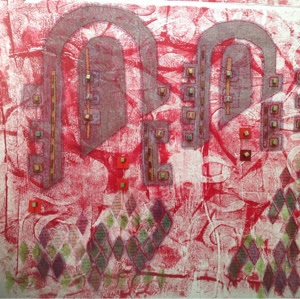
Next small leaves - an old book page painted with copper acrylic paint. I used Hobbycraft own brand. Other paints will have more pigment, but this is perfect for what I usually need. (I am not a pure painter after all). And attached with PVA glue.

And the final layer is nylon organza - graduated pink/copper in colour.
I stick this down with vilene Bondaweb. The paper copes with the iron well.
And finally stitched - free motion machine embroidery.

The wax crayon acts as a resist for the next layer - the ink.
Be aware if you fancy having a go at this. There are two types of Neocolour crayon - Neocolour II is watersoluble. They look pretty identical to me but I only have the water resistant ones, and they're the ones you need for this technique.
Also, I have used just a simple Crayola wax crayon for this technique - the results were just as good thought there will be less pigment in the Crayola.
For the ink I used 'Infusions' powder ink in Sunset Beach.
Seen here doing it's thing on another piece of paper. (I create stacks and stacks of paper I can just dip into when I want it)
There is little science to this. The powder is sprinkled on and then spritzed with water. Then you let it 'do its thing'.
After that I have found it is best to set the ink. Infusions will run again if they get wet - they are not permanent, unlike Inktense pencils. And while I won't be putting my work out in the garden I think it is best to set it as much as possible. I used a spay fixative - a standard one suitable for paints and pastels etc.
Next small leaves - an old book page painted with copper acrylic paint. I used Hobbycraft own brand. Other paints will have more pigment, but this is perfect for what I usually need. (I am not a pure painter after all). And attached with PVA glue.

And the final layer is nylon organza - graduated pink/copper in colour.
I stick this down with vilene Bondaweb. The paper copes with the iron well.
And finally stitched - free motion machine embroidery.


For the actual lampshades I use supplies from Needcraft/dannells. You can buy pre-cut panels and rings to match.
I won't tell you how to use the actual panels and rings. Other people have made good videos to explain that. This is one of the best - there are some very good tips on this one.
So there you are - a mini tutorial explaining one of my techniques.
These and other lampshades will be on display at Hampshire Open Studios. I am sharing a bit of space with Rob Turner China at their studio and mini gallery, The Vestibule at 4RC. If you are anywhere near Gosport the studio will be open 10am to 5pm every day of this artistic festival which runs from the 19th to the 28th August. Hope to see some of you there.


I have 2 of these lampshade kits languishing in my stash. I may actually get them out and use them (but don't hold your breath!). Thanks for sharing your tutorial, you've made 2 lovely shades. I've pinned the video to refer back to so thank you for that too. I just need to get off this wretched computer and start the day now :-)
ReplyDeleteI must say I am hooked. Basically a brilliant way to create a 3D embroidery. And while a bit fiddly in parts really not difficult. Give it a go!
DeleteThese look brilliant! Thank you for your inspirational post x
ReplyDeleteWhy thank you Mrs B!
DeleteThese really are "my" colors, although I realize they might clash a bit with my current livingroom decor. Perhaps better in my bedroom? ;-) Seriously, these are great and I hope they sell for you.
ReplyDeleteThanks Sheila. I do love these it must be said.
Delete