But before we get there, here is the making process.
I've been working away quietly on another little handmade book, again based on a bit of recycled packaging as the cover and starting point (but this time much smaller than the Boneo books from earlier in the year).
And this little book has been a long time coming. I knew that I wanted to use words in this one but wasn't sure what and how.
And then, in clearing up, I found a little book of quotes. You know, one of those tiny books that you see all around the place at Christmas time. And the title and the content were immediately apparent.
But let me talk you through the construction.
To start with, I wanted to use some new paper I had acquired - a lining paper from a DIY store ( you know the one, orange and black!)
I don't have the labeling as I shared this with Daughter No 1 but I can tell you that if you go to the wall paper aisles you will find different weights of paper, and this was one of the heavier papers. It has a lovely, almost soft, texture. Ideal, I thought, for a bit of mixed media.
So out came the brusho inks.

Sprinkled dry onto the paper and then spritzed (two colours - brown and aquamarine)


Then I also coloured some pelmet vilene - trimmings from the display folders for FoQ.
The inks work a bit differently on the vilene.


But they colour it beautifully.
However, I wanted some texture too.
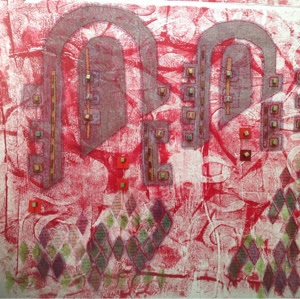
So I mixed some Grunge Paste with my favourite fresco finish acrylic paint in Tikka (I am beginning to sound a bit like an advert- sorry) and applied it through a couple of stencils.


I just love the way that the inks bled into the grunge paste, because when I applied the paste the pelmet vilene was still wet. A lucky accident.

At this point, or at least after the pelmet vilene had dried, I got the sewing machine out.
I decided on a zig zag format, and stitched some of the squares onto the paper to make little pockets.

Next I turned my attention to the cover.
So I first of all stiched a piece of canvas, and then gessoed it. Then I added more inks.
But - I could not get the intensity of colour I wanted. Inks and gesso - not a match made in heaven!


So I tried adding paint too.

But no matter what I tried it all looked too washed out. And in fact the colours did not match (which does not really come across in the pictures here). Actually it was yuk!
So I tried a new tack - ink dyed paper towels (previously used to mop up the original surplus ink - especially from the vilene).
Attached to paper with Golden matt medium.


That's more like it.
So more stitching (when it was dry).


Back to the pages, or rather the little tags to go in the pages, and I used snippets from that little book I found to create the words.
Some are straight copies, some are adapted.
The paper was too white so I have coloured it slightly with Distress ink.


You'll have to pop back later to see the finished article!


Looking rather fab Hilary!
ReplyDeleteStill some way to go.
DeleteThis is AMAZING Hilary! When will it be finished?!
ReplyDeleteHa ha - well......
DeleteIn truth been doing some handmade paper beads this afternoon for it, so work is progressing but this is a slow one. Really need tight deadlines to keep me on track!