This story begins back here, when I was experimenting with new inks. And maps!
I had a plan and that plan has now come to fruition.
But, dear reader, let us recap.
You may recall I inherited a box of old maps after my dad passed and Mum was having a bit of a purge. She was up for throwing them away, so I volunteered to liberate them and offer them a chance at new life.
I could have left them alone and just cut them up, but where is the challenge in that?
So first up I coloured them with powdered inks - Brusho in this case but for some I also used infusion inks which include a walnut stain giving the colours a vintage feel.
I use the powders dry - sprinkling them into the paper and then spritz with water.

These inks have to be fixed. They are not permanent and if they get wet again will run. So when dry I used a universal fixative to make the colour permanent.
I then made two styles of lampshade using these coloured maps.
First up the closely embroidered shades.

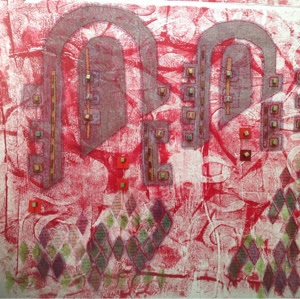
First of all I used coloured papers and foil to collage small organic shapes onto the coloured maps.

Then I used organza to layer over the map.
I backed the organza with Bondaweb.

To make the organza manageable, I used squares and rectangles of the backed organza which I layered over the paper (these were substantial shapes, at least 6 inches on the smallest edge. I did not use little fiddly patchwork organza pieces). I pressed these down onto the maps with an iron in the normal way. Map paper is very forgiving and will happily get wet, dry out again and then take an iron without complaint.
Then I stitched.


And here is the back of one of the maps showing the stitch detail.

To make the lampshades I used kits available from here ( in fact, I only used one actual kit, the company sells the component parts separately. And I have to say they also sell really good double sided tape.)
I will share the tutorial on making up the actual lampshades separately.
Here is one of the finished articles.

I was very pleased with the result.
Next up, much simpler sewing.
Again I used maps coloured with inks. But this time all I did was use larger images cut out of a book which I stuck with a dab of clue just to position them and then stitched in place.

Drum shape and oval shape.


And finally a series of granny lampshades just using stitched papers, though some of the papers were from my stash of decorated papers (texture with gesso then coloured with paints and inks). No embroidery or embellishment st all - I just stitched the panels together.

Now, it's very difficult photographing lights. There must be a knack. I haven't got it.
But you get the gist.
I love all of these I will be market testing them at The Workshop Sale. It will be interesting to see what reaction I get.


These are stunning Hilary, I will look forward to seeing your tutorial on making them up. I have just moved, and have been looking for new lampshades, and apart from being quite disappointed in lack of choice, most of the ones I have seen have also been extremely expensive! This looks as though it could be my answer!
ReplyDeleteCath - I will never buy another lampshade. They really are disappointing when you look around - I agree.
DeleteI've prepared the blog for the basic tutorial - it will pop up on the 15th. But it is fairly basic as I've just pointed you to the. Company website and their tutorial. If you want to know more about my map technique then let me know. May be I could put together a detailed tutorial over Chirstmas. Or where are you? Happy to meet up to explain the process if you would like.
Maybe this should be my first foray into teaching! Something I'd love to do.
By the way they went down a storm at The Workshop Sale. Very popular and for the bases I sourced some via charity shops ( where they PAT test the electrics they sell) and resprayed them with spray paint. They were a success too.
Hope the move went well. Have you blogged recently? If so I've missed them. Sorry. Moving my blog reading to Bloglovin as I'm not sure Blogger is always so reliable but it's taking time to move my blog list.
Best wishes xxx
Thanks Hilary, I'm sure you would be very successful teaching, with some great ideas! I will go back and click on your link for the tutorial, and what a good idea to use charity shop finds! I wouldn't necessarily be using maps, not too sure yet what I would use, but I would definitely like to have a go at something. I'm in Eastbourne by the way, and so much arty stuff seems to go on here too, so I'm in for an exciting time I think! Thanks for your info, very generous of you to offer some help too. xxx
DeleteAmazing! X
ReplyDelete