
I am sure that I have promised to share a process with you - how I make lampshades from old maps.
This started about 3-4 years ago. A happy accident if you will.
After my father died I was staying with my Mum, and we had a little session clearing out some of his stuff from the loft. One box contained old maps. Not historic, vintage maps. Just old maps that had been bought for holidays or we just had knocking around for a while.
Mum asked if I would get rid of them - perhaps I could take them to a charity shop.
So I put this box in the car and brought it home.
But I did not take it to the charity shop immediately. I brought it in from the car and plonked it down in the studio.
Now, at the time we were planning Transformation - the exhibition in Milton Keynes that we ran in October 2016. In the run up to the exhibition the concept of landscapes changing over time had been playing on my mind.
I looked at the maps in the box and realised that they would not be of much use to a charity shop. They were out of date. I cannot remember which one now, but one was of an area I knew quite well and there was a road missing - clearly a road had been built after the map was published. Not a lot of use as a map then!
And then I realised that the paper was just fantastic - it would be robust enough to take wet media and a bit of stitch. And I began to use maps as a background for a new body of work.


Now I love doing work for display on walls, but you run out of wall space and one day the idea of using the maps in a three dimensional way dawned on me - lampshades!
I have written about this before. You can see a previous blog post about making lampshades here.
But let's return to these. I promised I would share this process - and the key element is the background decoration.

Start with a map, a stencil and a wax crayon. The wax crayon will give you resist for the inks you will use later.
I just use a basic Crayola wax crayon - nothing special. The stencils I use for this are just commercial stencils. Again nothing special.

Vigorously use the crayon and the stencil to create a pattern. Put the stencil under the map and rub.
The picture below shows the sort of effect you get. You can make out the stencil pattern in the bottom right hand side of the map.

At this point I should tell you that the map above is not I used for these blue lampshades. In fact, for these lampshades, I used a white wax crayon and a different stencil. But you get the idea. (you can't see the wax with the white).

Then I use ink - in this case I was going for a vivid blue so I used Brusho inks.

Sprinkle the ink on and then spritz with water.
You want to be generous with the ink powder but not so much that you completely obliterate the map.
Here is the effect you are after and you can see the stencilling beneath.


You need to fix the ink. I use a spray fixative, in this case something I had bought from Hobbycraft.
I also had help! I was doing this in the garden on a lovely hot summers day.

Back to the map.


I chose the size of panel I wanted from my stock. This was not a particularly big map but large enough for two panels to turn into oval lampshades.
Then I selected embellishments. I have a number of different 'styles' of map lampshades - some are very heavily stitched but these I wanted to keep relatively simple.
I chose images from an old copy of 'Diary of an Edwardian Woman'. I have about 3 copies of this - I collect them from charity shops, snatching them up when I see them. The images are perfect for this sort of work and I really like the paper this book was printed on - it has a real 'watercolour paper' feel to it.

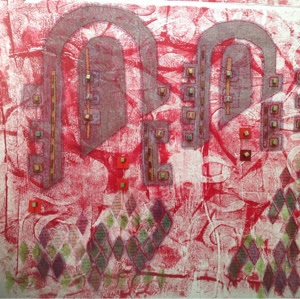
For these lampshades I selected bird related images, though with a couple of plants to add a bit of balance and interest.
I stick the paper onto the map, thinking about the construction of the final lampshade, and then stitch, in this case with a contrasting red thread. One thing to add is that I do iron the maps to press out creases and crumples. You want the paper as flat as possible when you construct the lampshade.
And finally, I assemble the lampshade.
As I mentioned above, I have done a similar tutorial on making lampshades before - and that included a video of how to actually assemble the shade. Pop over to this blog post to see the video and a slightly different take on map lampshades.
Finally, why not have a go yourself.
Thanks for reading.


Hilary, you've done it again! Another inspirational blog! I just happen to have a drawer full of Michelin maps of France and the Edwardian lady book you mentioned but I don't make lampshades, maybe they could become greeting cards or book covers..... Thank you xx
ReplyDeleteThey'd make fabulous cards I think. Now you've got me thinking too! Thank you for your very kind words. Xxx
Delete